Vibe Coding: A Drone Dashboard in Next.js with AI
Got VS Code and the will? I will show you how to install Node.js, set up a Next.js + Shadcn UI stack, and use AI to build a drone command centre in an hour.
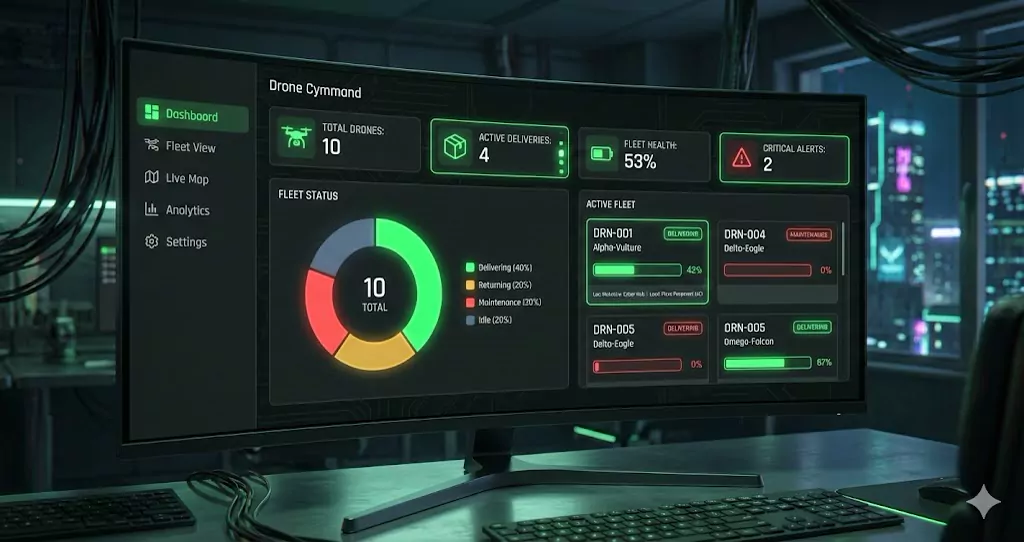
Welcome to the future! 🛸
Today we are not going to learn dry theory. Today we do vibe coding. The goal is to build a delivery drone fleet command centre for a futuristic Warsaw. Sounds complicated? A handful of well-aimed prompts is all you need to add a striking dashboard to your portfolio.
The premise is simple: you have a clean computer, VS Code installed, and only a little knowledge of how to manage packages. I will take you through installing the engine (Node.js), configuring the bodywork (Next.js + Shadcn) and switching on the autopilot (AI prompting).
Buckle up. We are flying. 🚀
🛠️ Phase 0: Preparing the machine (Node.js)
Got VS Code? Great. But VS Code is only a code editor. To run a modern frontend you need a runtime.
If you type npm in the terminal and see an error, you need this step.
Installing Node.js (your engine)
- Go to nodejs.org.
- Download the LTS (Long Term Support) version — the stable, civilian build.
- Install it like any other program (Next, Next, Finish).
Verification
Open the terminal in VS Code (Ctrl + ~) and type:
node -v
npm -v
If you see version numbers (v20.10.0, for instance) you have the engine and the package manager (npm). We can start.
🏗️ Phase 1: Installing Next.js + Shadcn UI
We will not create folders by hand. We do it like professionals, installing everything in the current directory.
Step 1: Initialising Next.js
Open a terminal in the folder where you want the project (C:\Projects\Drone-Dashboard, say) and type:
npx create-next-app@latest .
⚠️ Important: note the dot . at the end. It means "install HERE, do not create a new folder".
Configuration (choose exactly this):
- TypeScript: Yes (the standard in 2025)
- ESLint: Yes
- Tailwind CSS: Yes (essential!)
- src/ directory: Yes
- App Router: Yes
- Customize import alias (@/*): Yes
(these days there is also an option to accept the recommended settings)
Step 2: Installing Shadcn UI
When the Next.js installation finishes, in the same terminal type:
npx shadcn@latest init
Choices in the wizard:
- Style: New York (or whichever you prefer)
- Base Color: Slate or Zinc
- CSS Variables: Yes
(this installer also offers recommended options now)
Step 3: Installing components (optional, for testing)
Shadcn does not install everything at once. Let us add what the dashboard needs:
npx shadcn@latest add card button badge table progress separator avatar sheet chart
I would rather list the example components inside the prompt we write later.
💾 Phase 2: Data (fuel for the application)
Before we ask the AI to generate a view, we have to give it data. The model cannot guess what our drone looks like. Let us create a file of mock data.
- In the
srcfolder create a new folder calleddata. - Inside it create
drones.json, or any name you like. - Paste in the following:
[
  {
    "id": "DRN-001",
    "callsign": "Alpha-Vulture",
    "status": "delivering",
    "battery": 42,
    "location": "Mokotow, Cyber-Hub",
    "load": "Pepperoni Pizza (x2)",
    "lastMaintenance": "2026-01-10"
  },
  {
    "id": "DRN-002",
    "callsign": "Beta-Hawk",
    "status": "idle",
    "battery": 95,
    "location": "City Centre, Main Base",
    "load": "None",
    "lastMaintenance": "2026-01-12"
  },
  {
    "id": "DRN-003",
    "callsign": "Gamma-Sparrow",
    "status": "returning",
    "battery": 15,
    "location": "Wola, Drop Zone",
    "load": "None",
    "lastMaintenance": "2025-12-28"
  },
  {
    "id": "DRN-004",
    "callsign": "Delta-Eagle",
    "status": "maintenance",
    "battery": 0,
    "location": "Zoliborz Service",
    "load": "Damaged motor",
    "lastMaintenance": "2025-11-30"
  },
  {
    "id": "DRN-005",
    "callsign": "Omega-Falcon",
    "status": "delivering",
    "battery": 67,
    "location": "Praga Polnoc, Sector 4",
    "load": "Urgent medication",
    "lastMaintenance": "2026-01-14"
  },
  {
    "id": "DRN-006",
    "callsign": "Zeta-Raven",
    "status": "idle",
    "battery": 88,
    "location": "Ursynow, Loop",
    "load": "None",
    "lastMaintenance": "2026-01-05"
  },
  {
    "id": "DRN-007",
    "callsign": "Sigma-Owl",
    "status": "delivering",
    "battery": 24,
    "location": "Wilanow, Palace",
    "load": "Kebab Box XL",
    "lastMaintenance": "2026-01-15"
  },
  {
    "id": "DRN-008",
    "callsign": "Theta-Kestrel",
    "status": "returning",
    "battery": 8,
    "location": "Ochota, Campus",
    "load": "None",
    "lastMaintenance": "2026-01-02"
  },
  {
    "id": "DRN-009",
    "callsign": "Iota-Swift",
    "status": "maintenance",
    "battery": 100,
    "location": "Centre Service",
    "load": "GPS calibration",
    "lastMaintenance": "2025-12-15"
  },
  {
    "id": "DRN-010",
    "callsign": "Kappa-Heron",
    "status": "delivering",
    "battery": 55,
    "location": "Bialoleka, Port",
    "load": "Spare parts",
    "lastMaintenance": "2026-01-11"
  }
]
🧠 Phase 3: AI prompting (the senior architect)
Now the crucial moment. We are not going to write code by hand, line by line. We will use an AI model (Claude Sonnet, GPT, DeepSeek or whichever you prefer) to assemble it for us.
But note: the quality of the prompt determines the quality of the code. Below is a prompt built on engineering best practice — role-playing, context, constraints.
Where do you use AI? A guide to the tools
You have several options for using AI while writing code. The choice depends on budget and preference.
1. Models in the CLI (terminal) If you want to work directly in the terminal, you can use tools such as:
- Claude CLI — access to Anthropic's models from the command line
- OpenAI API — GPT integration through the terminal
- Ollama — local AI models (free, but they need computing power)
Installation is simple, and detailed instructions for each tool are easy to find online.
2. VS Code extensions (RECOMMENDED) The most convenient option for most developers:
-
GitHub Copilot (USD 10/month, with student discounts available)
- The best price-to-quality ratio
- Handles the context of a whole project very well
- Real-time autocompletion
- A chat panel built into VS Code
-
Cursor (free tier plus paid plans)
- A fork of VS Code optimised for AI
- "Composer" mode for editing several files at once
- Excellent for larger refactors
My recommendation: start with GitHub Copilot. It is intuitive, works out of the box, and you do not have to configure API keys. When you feel you need more, try Cursor as well.
📋 THE PROMPT TO COPY
Copy the whole thing and paste it into your AI assistant:
You are a senior frontend architect and UI designer specialising in pixel-perfect design systems. We are building a dashboard application: "Neo-Warsaw Drone Command Center".

Your goal is to produce code that looks like a premium-class product (Linear, the Vercel dashboard, the interfaces of the biggest applications). We are visual purists.

YOU ARE IN A FOLDER WITH A BASIC, CLEAN INSTALLATION OF NEXT.JS + SHADCN. Everything is installed and ready to work with. You also have a file of mocked data: src/data/drones.json — use it.

### 1. TECHNOLOGY STACK (follow strictly)

- **Framework:** Next.js (App Router, TypeScript).
- **UI kit:** shadcn/ui (using the components: Card, Sheet, Button, Table, Avatar, Separator, Badge, Progress and any others the application needs).
- **Charts:** shadcn/ui charts (based on Recharts) — THIS IS A HARD REQUIREMENT; use additional libraries only where genuinely necessary.
- **Styling:** Tailwind CSS (using shadcn's CSS variables for theming). The dashboard should have a slightly cyberpunk, neon character.
- **Icons:** Lucide React.
- **Data:** import from the local file `src/data/drones.json`. Everything you need is already there.

### 2. DESIGN RULES (VISUAL PURITY)

RESPONSIVE DASHBOARD!

- **Theme:** dark mode only. A "clean cyberpunk" aesthetic (dark backgrounds, subtle neon accents, but no kitsch).
- **Layout:**
  - Desktop: a fixed sidebar on the left with the navigation, content on the right.
  - Mobile: a top bar with a hamburger menu (opening a shadcn Sheet), content below.
- **Aesthetics:**
  - Minimalism, plenty of whitespace (p-6 or p-8 padding, even spacing, keep to the grid).
  - Subtle borders (`border-border/40`, which may be dropped if you judge it better).
  - Typographic hierarchy (use `text-muted-foreground` for descriptions, technical typefaces).
  - Corner radii consistent with shadcn's default `radius` (do not mix radii).
  - Statuses:
    - Delivering: emerald/green (with a pulsing effect if possible).
    - Maintenance: destructive/red.
    - Returning: amber/yellow.
    - Idle: slate/grey.

### 3. DATA (context)

The data lives in `src/data/drones.json`.
The data structure (interface):

```typescript
export interface Drone {
  id: string
  callsign: string
  status: "idle" | "delivering" | "returning" | "maintenance"
  battery: number // 0-100
  location: string
  load: string
  lastMaintenance: string
}

### 4. TASKS (step by step)

**Step 1: types and utilities**

- Create `src/types/index.ts` with the Drone interface.
- Create helpers that compute:
  - The number of active drones.
  - The fleet's average battery level.
  - The number of drones in maintenance.
  - Any other interesting figures you can extract from the JSON.

**Step 2: dashboard components**
Build the main view (`src/app/page.tsx`) out of three sections:

1. **KPI section (top):** four cards (shadcn Card) with Lucide icons.
   - Total drones, active deliveries, fleet health (average battery), critical alerts (battery below 20%) — feel free to add your own.
2. **Fleet overview chart (middle, one third of the width):**
   - A donut chart (from `shadcn/ui charts`) showing the split of drones by status.
   - The legend and tooltip must be stylistically consistent.
3. **Active fleet grid (middle/bottom, the remaining width):**
   - A grid of drone cards (not a table!).
   - Each card contains:
     - Header: callsign plus a status badge.
     - Body: a battery bar (a progress bar changing colour: green above 40%, yellow above 20%, red below 20%).
     - Footer: location and payload in small print (`text-muted-foreground`).

### EXPECTED OUTPUT

Give me the finished code in this order:

1. `src/types/index.ts`
2. `src/app/page.tsx` (the complete dashboard view with imports and logic).
   The code must be copy-paste ready and fully typed.
```
🚀 Phase 4: Running and debugging
Once you have the code from the AI:
-
You have a finished application. If you used a model in the browser, paste the code into the appropriate files (mainly
src/app/page.tsx). -
Start the development server:
npm run dev
- Open
http://localhost:3000in the browser. You should see your command centre.
🔧 What if something does not work? (troubleshooting)
A common error: "Unable to acquire lock" or "Port 3000 is in use". It means an old Node.js process did not shut down properly.
The fix (in a PowerShell terminal):
taskkill /F /IM node.exe
Then run npm run dev again.
🗄️ Phase 5: From JSON to a real database
Congratulations — you have a working dashboard. But data in a JSON file is only a mock; a real application needs a database.
For this project I recommend serverless databases, which:
- ✅ Have a free tier (perfect to start with)
- ✅ Scale automatically with the project
- ✅ Require no infrastructure configuration
- ✅ Integrate with Next.js in minutes
Option 1: Supabase (PostgreSQL as a service)
Supabase is an open-source alternative to Firebase, built on PostgreSQL.
Why Supabase?
- 🆓 Free tier: 500 MB of database, 1 GB of transfer, 50 MB of storage
- 🔐 Built-in auth (user sign-in)
- 📡 Real-time subscriptions (data updates live)
- 🛠️ An admin panel (like phpMyAdmin, only better)
- 📚 Excellent documentation and a Next.js SDK
When to choose Supabase:
- You need a relational database (tables with foreign keys)
- You want to use SQL for queries
- You plan to add user authentication
Option 2: InstantDB (the ultra-minimal alternative)
InstantDB is a new generation of database, written from scratch for React and Next.js.
Why InstantDB?
- 🆓 Free tier: up to 100k operations a month
- ⚡ The smallest learning curve (literally three lines of code)
- 🔄 Real-time out of the box (no configuration)
- 🎯 TypeScript-first (IDE autocompletion)
- 📦 No schemas — add data and it works
When to choose InstantDB:
- You want the least possible boilerplate
- You value the "magic" — everything works immediately
- The project is an MVP or prototype (fast iteration)
My recommendation
For this project: start with Supabase.
- The free tier will last for years
- You will learn PostgreSQL (an industry standard)
- Migrating to your own instance later is easy
- The community and the learning material are enormous
📚 References and inspiration
This project is only the beginning. To go deeper into the modern stack and the "vibe coding" approach, I recommend these two videos. They are an excellent knowledge base:
-
AI Coding Crash Course – an interesting tutorial on filling out your portfolio with AI.
-
Vibe Coding - a dashboard with Google AI Studio – see an example of a dashboard being generated.